I've just added a new page to my blog.
This one is all about painted and decorated spaces!
Something I've been doing for quite a while but just never really advertised all that much.
So I'm taking the leap and putting this one out there and hoping to build up this part of my business because it is something I truly enjoy getting to do for others.
Be sure to click on the tab at the top of the page labeled Artful Interiors to take a look.
Maybe I can help you on your next painting/decorating project.

Showing posts with label interior decorating. Show all posts
Showing posts with label interior decorating. Show all posts
Tuesday, September 9, 2014


Tuesday, March 25, 2014
Stripes on the Ceiling

I recently spent the better part of a whole day up and down on a ladder with my arms in the air and neck craned back looking up in order to create a pattern of lovely stripes on a little girl's bedroom ceiling.
Thankfully I met a sweet new friend that day....... the little girl's grandmother, who kept me company, showed great kindness, shared stories and helped with the task immensely.
If you ever get the crazy idea to tackle a task like this yourself here are a few tips that may help you along the way:
- Have a can of paint that matches your ceiling color.
- Measure your room and plan out your stripes in whole numbers if possible or at least fractions that are easier to keep up with. Try to measure so that you don't wind up with a partial stripe if possible. Ours were 9.25" wide and made 17 equal stripes across the room so that it started on a colored stripe and ended on a colored stripe.
- * A standard roller is 9" wide
- Mark your measurements with pencil on the ceiling on opposite sides of the room (beginning from the same end so they match up)
- Do a chalk line before you try to put your tape up so that you can get really straight lines. (great to have a helper on this)
- Tape to the inside of the stripe that is going to be your ceiling color.
- Use a small roller on an extension handle to roll ceiling paint over the edge of the tape on the sides that will be painted with your new color......this will seal the tape to the ceiling and assure that any paint that seeps under your carefully placed tape will be the ceiling color and not the new color.
- Roll on your new color with the standard roller and then go over the edges with a small smooth roller.
- Do your edging by hand with a nice smooth brush made for cutting in.
- If you get paint somewhere it shouldn't go.....wipe it immediately with a wet rag or towel.
Good luck! Here's a look at the process...... (notice we also lowered the light fixture and removed vent cover before painting.
P.S. Don't move that ladder yet! lol (inside joke with my helper, ha, ha....disaster averted thankfully)

Now, most importantly you will probably need a major neck and back massage after a job like this.
Happy painting!
Wednesday, January 22, 2014
Custom Storage Ottoman with Tray

Storage ottomans are the greatest!
Or is it just me that thinks so.
Well, either way..... They can be customized in so many different ways to make them both beautiful and multi-functional.
This is the Custom Storage Ottoman that Jeremy and I created for some clients/friends of ours over this past long weekend. Can I say "LOVE how it turned out!!!" We have two small ottomans that we made years ago for our home..... which are fantastic; but I do love how this one can become a large table surface to play games on or have snacks during movie night, etc.
So, here are some of the specifics.
We started with the box which was 3'x3' square with 11" depth, constructed out of wood. (type of wood just depends on how you want to finish out the interior: stain, paint or unfinished).
The top actually has two pieces of wood. One that is 3'x3' which we attached 4" thick foam and batting to before upholstering. Then a second piece which was cut to fit the finished inside dimensions of the box after the batting and upholstery were put on.
*For this piece all of the wood was stained with Dark Walnut and then rubbed with Ebony before being waxed and buffed.
The round bun feet are also stained and waxed.
*Side Note: on our smaller ottomans we used recessed casters so that the ottomans can roll easily across the floor but the wheels don't show. This could also be done on the larger ottoman, but would probably need a fifth caster in the center of the ottoman for additional support.
If you are local to the North Dallas / McKinney area and are interested in a custom ottoman for your home please contact us for a quote.
jackiepattonart@gmail.com
Wednesday, August 7, 2013
Surprise Design Project - Prayer Closet

Jeremy and I got to work together on a couple of "surprise design" projects this summer. Pretty cool for us as we got to pretend we were like one of those HGTV design teams rushing to come up with our creative plans, purchase items, build and pull it all together while trying to beat the clock before the big reveal. The first project was a Prayer Closet.
A friend from church had the idea to surprise her husband for his birthday. Our job was to take the closet under their stairs and re-organize and re-design the space to give him a peaceful area where he could quietly reflect on God's word and spend time in prayer. We also needed to keep the back portion of the closet as useful storage space.
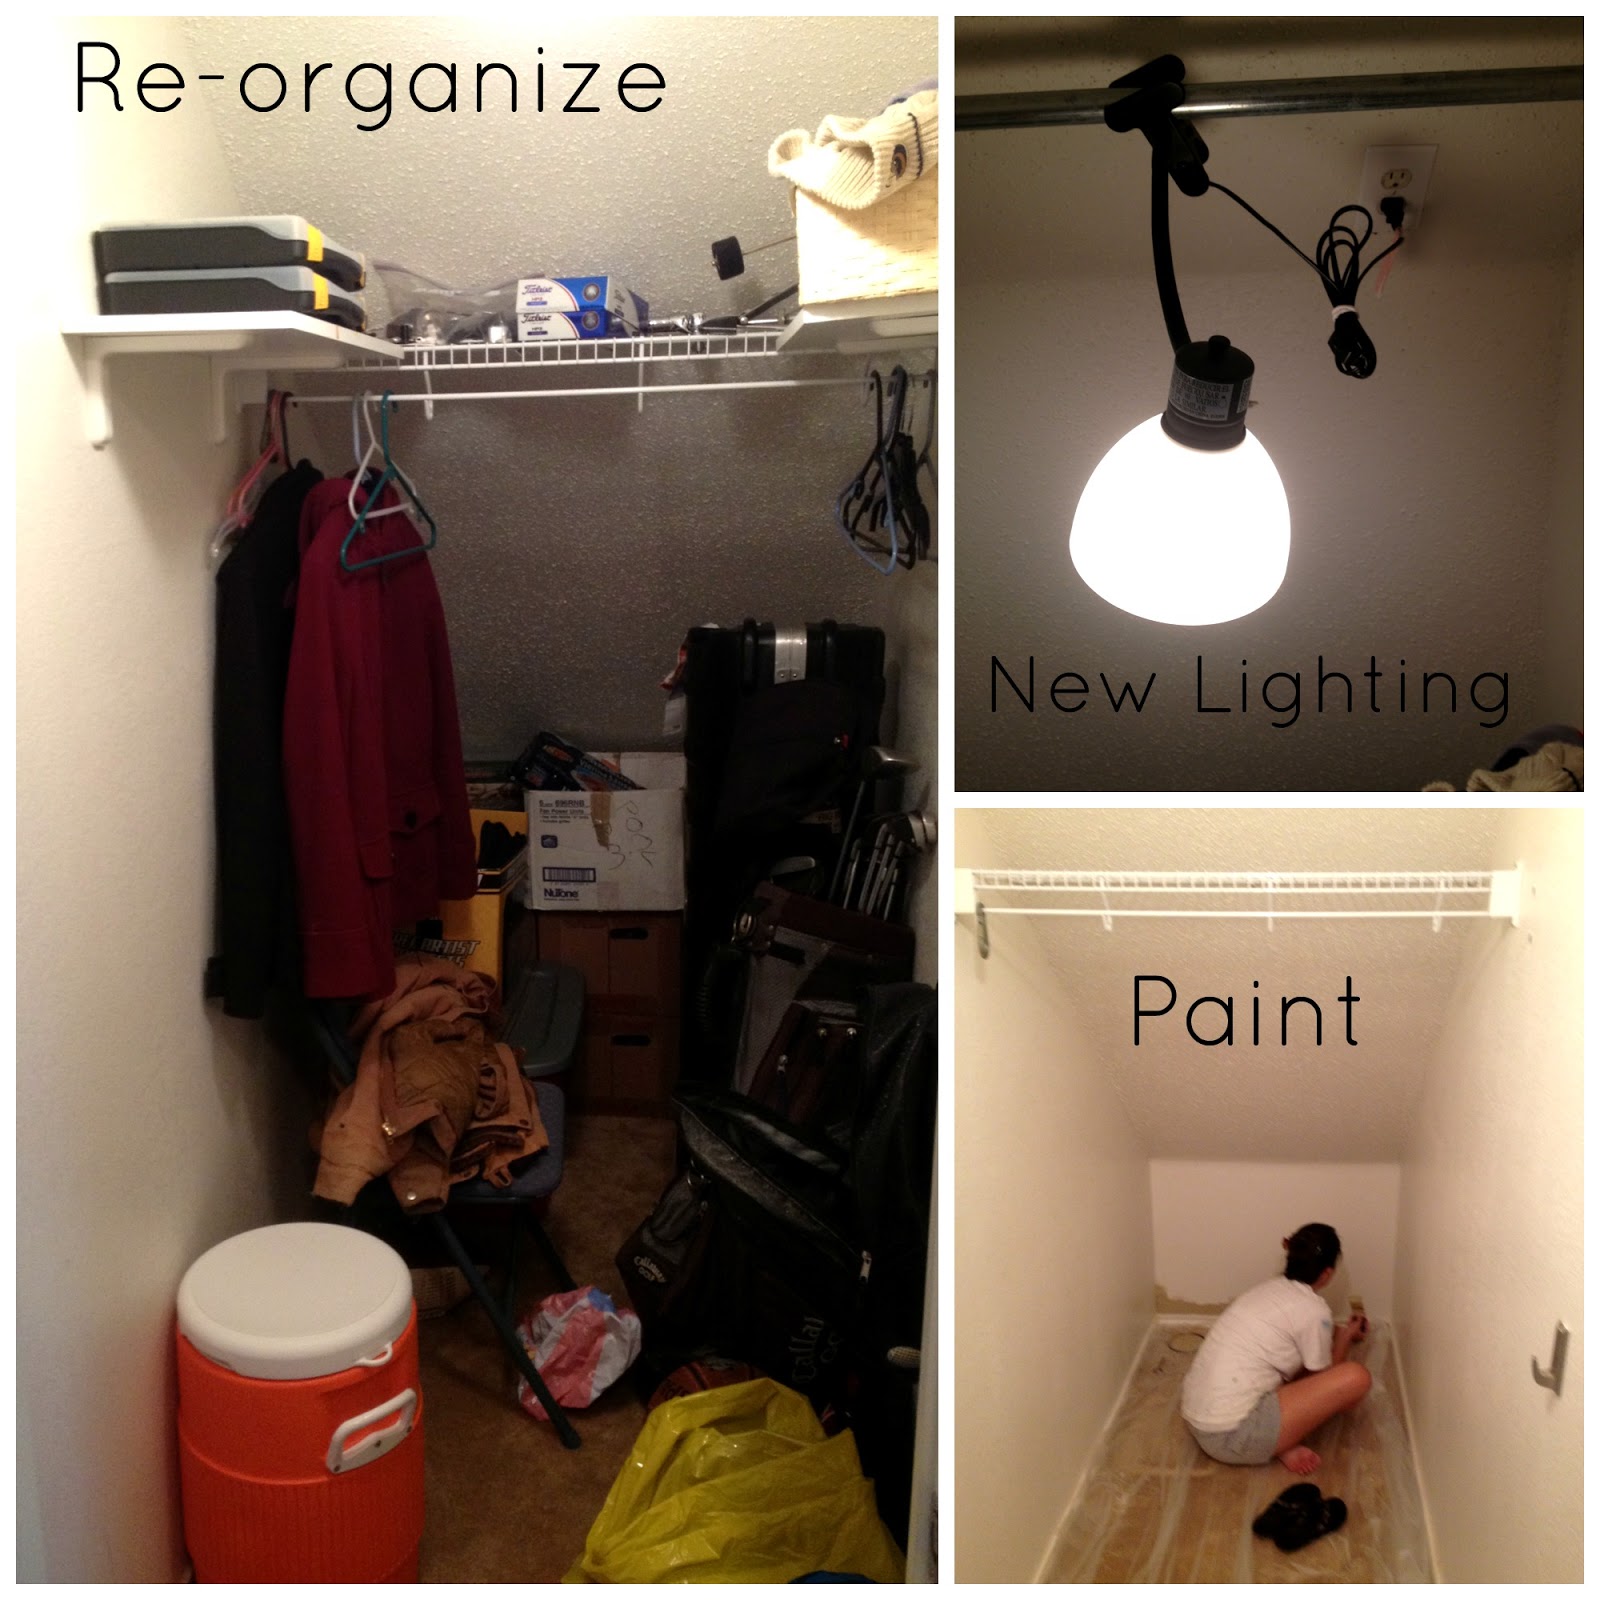
I went away from our first meeting with a few snapshots on my phone and several notes on my notepad. We got right to work discussing options....love this part of the process. All the possibilities.
Jeremy was excited to get to build something. I wanted a fold-away desk area and he came up with a very clever way to build it and install it on the wall. He created a small ledge that attached to the wall with hinges holding the desktop. Underneath were two triangular wooden supports also on hinges that would fold out to support the desk and easily fold in and tuck away when the desktop was lowered. Brilliant! The next thing we needed was a cool chair. But I also wanted it to be something that would fold up out of the way for those times that the family needed to get in and out of their storage area at the back of the closet. Fortunately, we have some great "trade days" markets in our area and I was able to find the perfect fold away chair. With a little paint touch up it was good to go.

We got into the space while the couple was out one Saturday and went right to work clearing everything out and painting a relaxing neutral khaki color on the walls. We took out some of the extra shelving and hung a new light fixture. It's hard to see in the photos but it is a vintage looking Edison bulb with an industrial metal hood. When the walls dried we hung the fold away desk and a nice cork board/white board combination. We moved the curtain rod that the lamp had been hanging on and re-positioned it to hang our divider curtain (a Better Homes & Gardens fabric shower curtain that I hemmed at the top to make a pocket for the curtain rod).

Here you can see the finished space as you enter through the closet door.


One of my paintings hangs over the message board.
It reads: "Let it be all for the Glory of the Risen King"

The desk folded away.

and chair folded away

storage space

And that's pretty much it.
Oh, but I must share the best part... the reveal!
The couple showed up early and we scrambled to get our things out of the way, we hid in the closet and frantically tried to put things in order as quietly as possible when someone turned the lights out on us and we were completely in the dark. All of a sudden the husband saw an electrical cord that was running under the closet door and came to investigate.....SURPRISE!!
We gave him quite a start. And we all had a good laugh. Then we shooed him away to the other room so we could finish up and then do the actual "big reveal". LOL.
It was a wonderful project and we were blessed by being a part of it. Thank you friends.
Friday, June 14, 2013
Design Work for Posh Little Pig's New Store Revealed!
Posh little Pig's owner, and my friend, Brina is such an inspiration!
She had a dream years ago of opening a very special children's botique and now,not only has she done it, but she has grown her business and moved to a brand new beautiful location in Sherman, TX. She sells the most unique clothing and accessories for little boys and girls you've ever seen!
When Brina asked me to help her with some ideas for the new store I was more than happy to meet with her and brainstorm. Then when she started referring to me as her store designer, I was over the moon excited. I LOVE getting to do things like this, but this is the first time I have had the chance to work with a store owner in designing an entire space! Wow! I was thrilled, to say the least!
For several months leading up to the store opening we brainstormed, shopped, shared ideas, talked colors, finishes, fixtures, lighting, displays and more and I felt so privileged that she would let me share in this whole exciting adventure! I am so very proud of Brina and her amazing courage, energy, passion and dedication. I know her business venture will be blessed and it will be a blessing to others.
Along the way I got to do fun things like re-finish and paint furniture pieces, design and create a huge mural. The mural is on the back wall behind the cash wrap. We had it covered in sheet metal and painted in chalkboard paint. Since it is metal we can also hang things on it and move them around using magnets. The chalk art can stay or change through the seasons.
Here are a few photos:

We hope to also do some very creative artistic window displays for the holiday seasons!
I'll share with you a few images from the construction phase:

Oh, yes and I must mention the scaffolding that I was so excited to climb up on and use (ha, ha....some of you know of my slight fear of heights, lol)
So, before I could start the mural in chalk I had to prime the chalkboard walls.
*Very important because if you don't prime your chalkboard walls then whatever you draw on first will leave a permanent impression.
We primed with black powdered chalk (the kind you use to mark a chalk line) and that was awesome because it kept the walls looking nice and new (unlike it looks when you wipe white chalk on it!)
Since I had around 300sq ft to cover I opted to use a large dust mop and dip it into a paint tray filled with chalk powder.
Can you imagine having to use sticks of chalk to color this wall and then wipe it off!!! No way!

Here we have the inside of the children's Fitting Room. Again you can see Brina's excellent taste in crystal ligting fixtures! So beautiful....the photo does not do it justice.
The walls are the same soft yellow and I have hand painted in script the words to the little piggy nursery rhyme wrapping around the three walls in light pink.
We did an almost tone on tone effect because we wanted it to be subtle.


I painted the text the way Brina's little boy says it so one word is different. See if you know what it is:
"This little piggy went to market, this little piggy stayed home, this little piggy ate a biscuit, this little piggy had none, and this little piggy went wee, wee, wee all the way home."
My favorite accessory to create for the store so far was the tie back for the fitting room draperies. I am in love with the flowers, feathers and details! I didn't want to part with it! Now I will have to make more so I can create bows for my girls!

And I have to share a little secret, I owe my mom a huge thanks for helping me in a time crunch with the sewing on the fitting room drapes! She didn't want me to mention that she helped but I cannot take credit for her beautiful work. Thank you mom!
I also thought I would share a picture of my original sketch for the store mural:

The mural has a "Fitting Room" sign with a little paper doll standing above. Her outfits hang from clothspins on the high wire. We used actual outfits to give a fun dimension to the wall design. There is a little toy plane flying through the sky and a sailboat braving the ocean waves. The opposite side of the room has a decorative chalk sign for the "Restroom". Behind the cash wrap we needed to display several special gift wrapping options for customers to choose from and Brina asked me if we could do a tree....Wow, why hadn't I thought of that to begin with! So smart! So I drew a tree and we hung the wrapped gifts from the branches. The tree can be decorated to compliment the seasons throughout the year. And since the wall is metal we can put magnets on leaves in the fall, ornaments for Christmas (and even lights), flowers in the spring.....and much more! Finally, we have our adorable little piggy riding on a unicycle holding his little umbrella.
My intent was to show images that would remind customers of happy childhood memories, fanciful daydreams and long treasured children's books. And I had a wonderful time along the way. Thank you Brina!

Please be sure to stop by and visit the new store location if you live in the area.
You can also "like" Posh Little Pig on Facebook. ;-)
Friday, March 22, 2013
Kids Church Re-Design: The "After" Photos
I'm so excited to share some of these after photos with you all!
We still have a few projects to work on over the next few weeks as time allows, but it is already an awesome transformation! I will post more pictures of finished projects as they come along.

***We also plan to add a cool sign above the check in counter.

Remember the really long wall on the east side of the room where there was an alcove on one end, bathrooms, janitorial closet, pass-thru window and kitchen entry......

I LOVE how the kids loved interacting with the room Sunday morning!!!
We also tackled the bathrooms and gave them a nice update. We still plan on adding some scripture wall art in each one, but for now you can see what a difference there already is.

We changed the bathroom countertops with a cool gray Rustoleum resurfacing paint! Very cool! Just make sure you have a good ventillator mask to wear cause the fumes are awful! lol
A large mural project:

So, there you have the re-design project as it is so far.
One thing you didn't see was that we also used some cool industrial pipe as a giant curtain rod and hung the same dark blue drapes that are on each side of the stage across the area in front of the pass-thru window that goes to the kitchen and it looks great too.
Still to come:
Entry: sign, doors, bulletin board
Green Wall: scripture mural
Turquoise Wall: some really amazing sculptures (it will be a surprise!)
Dark Blue Alcove: play area wall games
Tan wall across from Coat Hooks: cubby system for teacher use, art installation
Stay tuned for more updates! :-)
During the Renovations
Day one of the renovations walls started going up and major changes happened rather quickly.
We began our long process of staying up all hours of the night followed by coming back to work "later that morning". Days blurred into one another but our strength and energy were renewed each morning. There were no injuries or catastrophies during the week and our resources were multiplied and stretched over and over. It was a joy to be involved in all of it.

It was so cool to see God use the gifts and talents of all of these different people come together in this project.....things like electrical wiring, sound, computer technology, construction, budgeting, planning, organizing, design, painting, and so much more.

One night during the week our church invited anyone who wanted to be a part of the renovation to come up, grab a paint brush and join us. Childcare was offered and the turnout was incredible.
I love and appreciate each and every one of our amazing volunteers who came and worked so cheerfully alongside us that night and so many other times (day and night) through the entire week.
a community- a family- working together - loving others - following Jesus

Color really made the space come to life and toward the end of the week things were all coming together and we knew we would have something special to surprise the kids and the church with on Sunday morning.

......more pictures of finished projects to come in the next post. Yay!
Thursday, March 21, 2013
Kids Church Re-Design Part 1 - The "Before" Pictures
I am so excited to share this project with all of you!
Let's see, where to begin?
Ok, so a few weeks ago my sweet friend Jenna (our amazing children's minister) called me and asked if Jeremy and I would be interested in working with another insanely talented and creative couple in our church to do a little make-over in the children's building. You see, someone had made a donation to spruce the place up a bit and given this opportunity well, how could we possibly decline! We were super excited and we were going to pray over and stretch every penny as far as it would go as our imagination buckets were spilling over with ideas right from the start. It was time to create an exciting and inviting safe place (within the walls of this large stale gray portable bulding) for our kids to come and learn about the Word of God.
I cannot tell you what a thrilling challenge this project has been for us, and how blessed we feel to be a part of it.
Here are the "Before" photos of the children's building:
*P.S. Did I mention that our pastor told us when we joined the church last summer that there was another couple named Lori and Johnny that did all kinds of building and decorating projects and that someday we would wind up meeting them and when we did everybody better watch out cause there's no tellin' what kind of trouble the four of us would get into. LOL
Boy was that ever true!!! What a fabulous new friendship has blossomed out of this endeavor.

To the left as you enter there is a storage area for extra tables and chairs hidden by an accordian style wall enclosure. Then a window beside the exit door that leads out toward the church office and main sanctuary.
In this picture you can see the two tiered black stage with a large projection screen flanked by four large speakers. There is a small closet in the corner and a makeshift counter that serves as the "sound booth" and video control area.
Here you can see straight into the room as if you just walked in the front doors. Beside the "sound booth" was a large fun paper tree that went all the way up onto the ceiling tiles. Next to that were a couple of "office style" fabric covered partitions that created a little "wall" so that class supplies could be hidden on shelves behind it in the recessed area next to the other little utility closet (that has a water heater I believe).
As you continue around the room there is another alcove area on the right side of that small water heater closet.
Past the tables on the far east wall are three doors. The first is the boys bathroom followed by the girls bathroom and then the janitorial closet.
The lovely banners and christmas lights were decorations from a recent banquet.

continue on.....
Here you can see a little farther down that wall is a very large pass-thru style window between the kitchen area and this main room.
Finally on the end of that wall is the door to the kitchen.
Coming full circle you can see a wall section leading back to the main entrance where there are two windows that overlook the church playground area.
And now we are back to our entrance.
I hope you enjoyed the full circle view of how it used to be.
Just wait till you see what a transformation will take place in this space!
Monday, August 27, 2012
Geography Classroom Makeover
So, my hubby has a new classroom at the new high school this year where he will be teaching Geography. I love Geography and wanted to do something special for him to get the year off to a great start.
He works so hard and I'm so proud of him and thankful for all he does. Since he has been very busy with Football and back to school meetings, scrimmages, practices and all of those fun time consuming things I decided to give his room a little makeover. We were able to work together for a couple of hours before he had to leave for a scrimmage and it was fun to have that time together while grandma kept the kiddos.
Here is a visual tour of the way it was, the artworks I surprised him with, and the end result:


He works so hard and I'm so proud of him and thankful for all he does. Since he has been very busy with Football and back to school meetings, scrimmages, practices and all of those fun time consuming things I decided to give his room a little makeover. We were able to work together for a couple of hours before he had to leave for a scrimmage and it was fun to have that time together while grandma kept the kiddos.
Here is a visual tour of the way it was, the artworks I surprised him with, and the end result:

It was fun to surprise him with this special artwork. I love the quote I found to go with it!

These hanging globes were inspired by my obsessive love of Pinterest crafts!

And here's how it all came together:


Friday, March 9, 2012
A Sophisticated Little Girl's Bedroom.... With Horses!
I worked this week on painting lovely custom silhouettes of horses.
I designed the silhouettes of the little girl to resemble the sweet girl who calls this room her own, and I'm very pleased with the way it all came together.
Thank you Tenneil for inviting me to be a part of this special room design.

To begin, I worked a few drawings of what the client wanted. Once they were ready and approved I projected the finished artworks on the wall to get the perfect size and position and sketched them with a white pencil.

Then I began painting. I used two coats of a water borne alkline interior paint.
The end result is a beautiful statement piece for a lovely growing young girl's room.
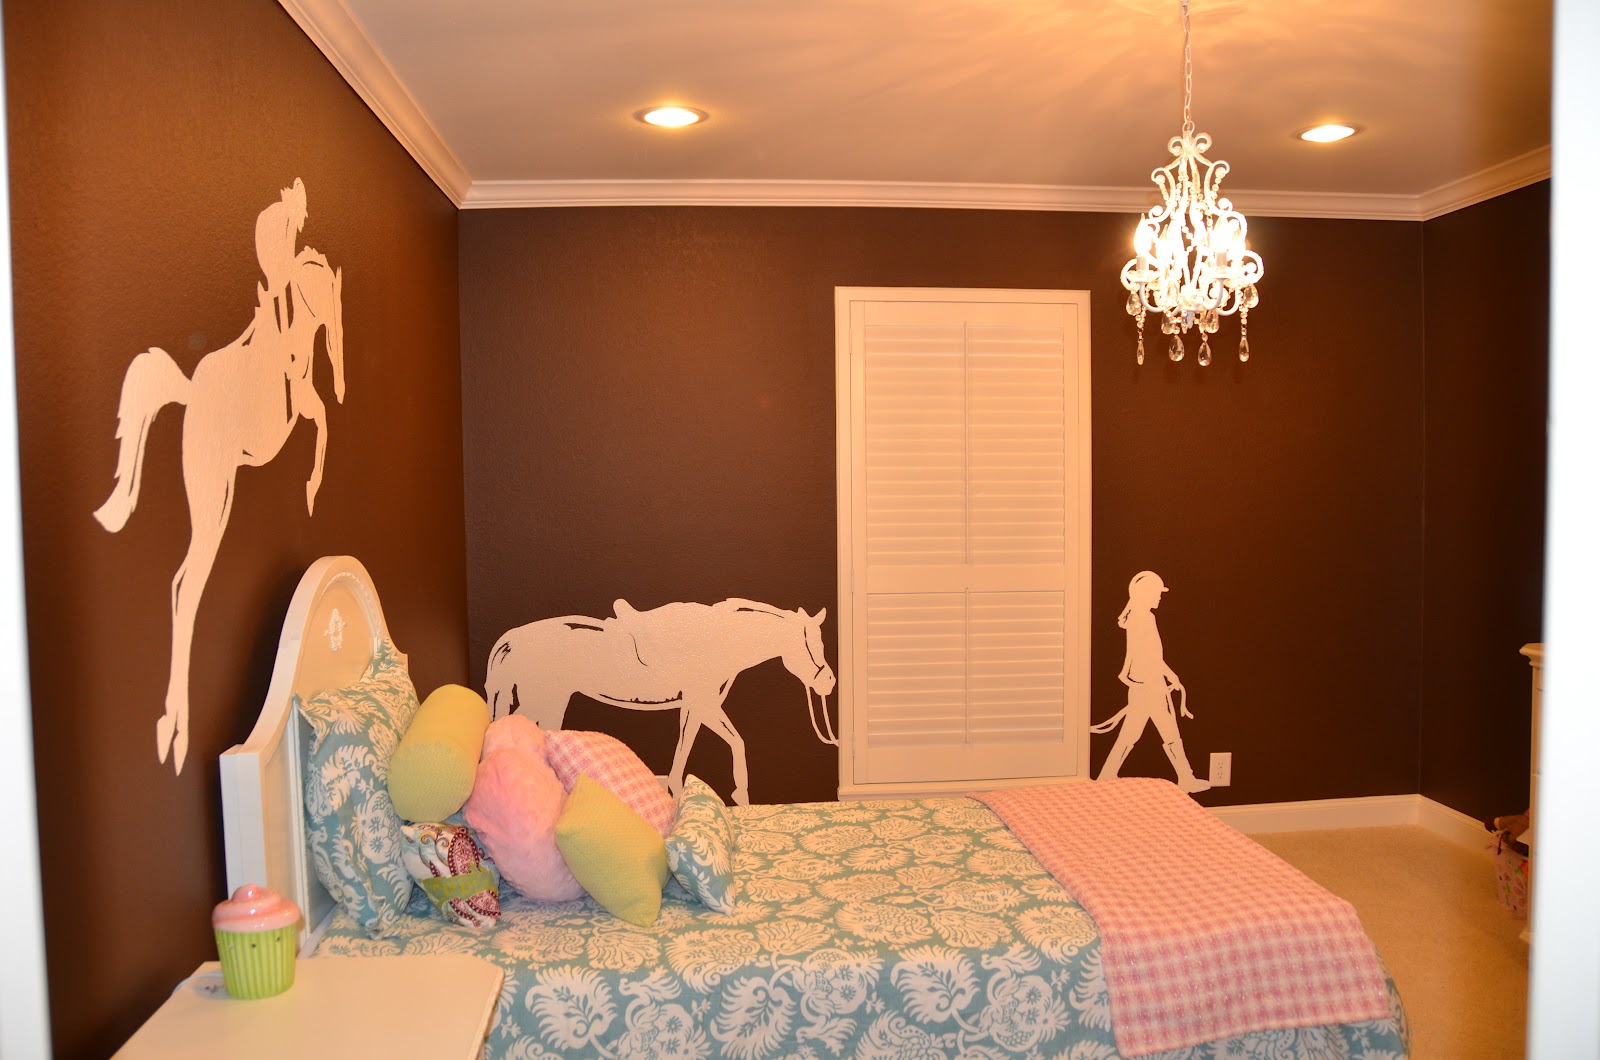
I love the way it looks with the other colors and patterns in the room.
Remember this bedding set I created back in December. ;)

Subscribe to:
Posts (Atom)